Google Meet
Please join the Google Meet classroom 10 minutes early to check your audio and video.
Close email and other programs to ensure the best performance.
Keep your microphone muted when you are not speaking.
Maintain the same level of courtesy and professionalism expected in an in-person class or meeting.
Use tools such as chat, polls, reactions, and the “raise hand” feature to engage with the session.
Be prepared to be called on directly by the instructor, as you would in a traditional classroom setting.
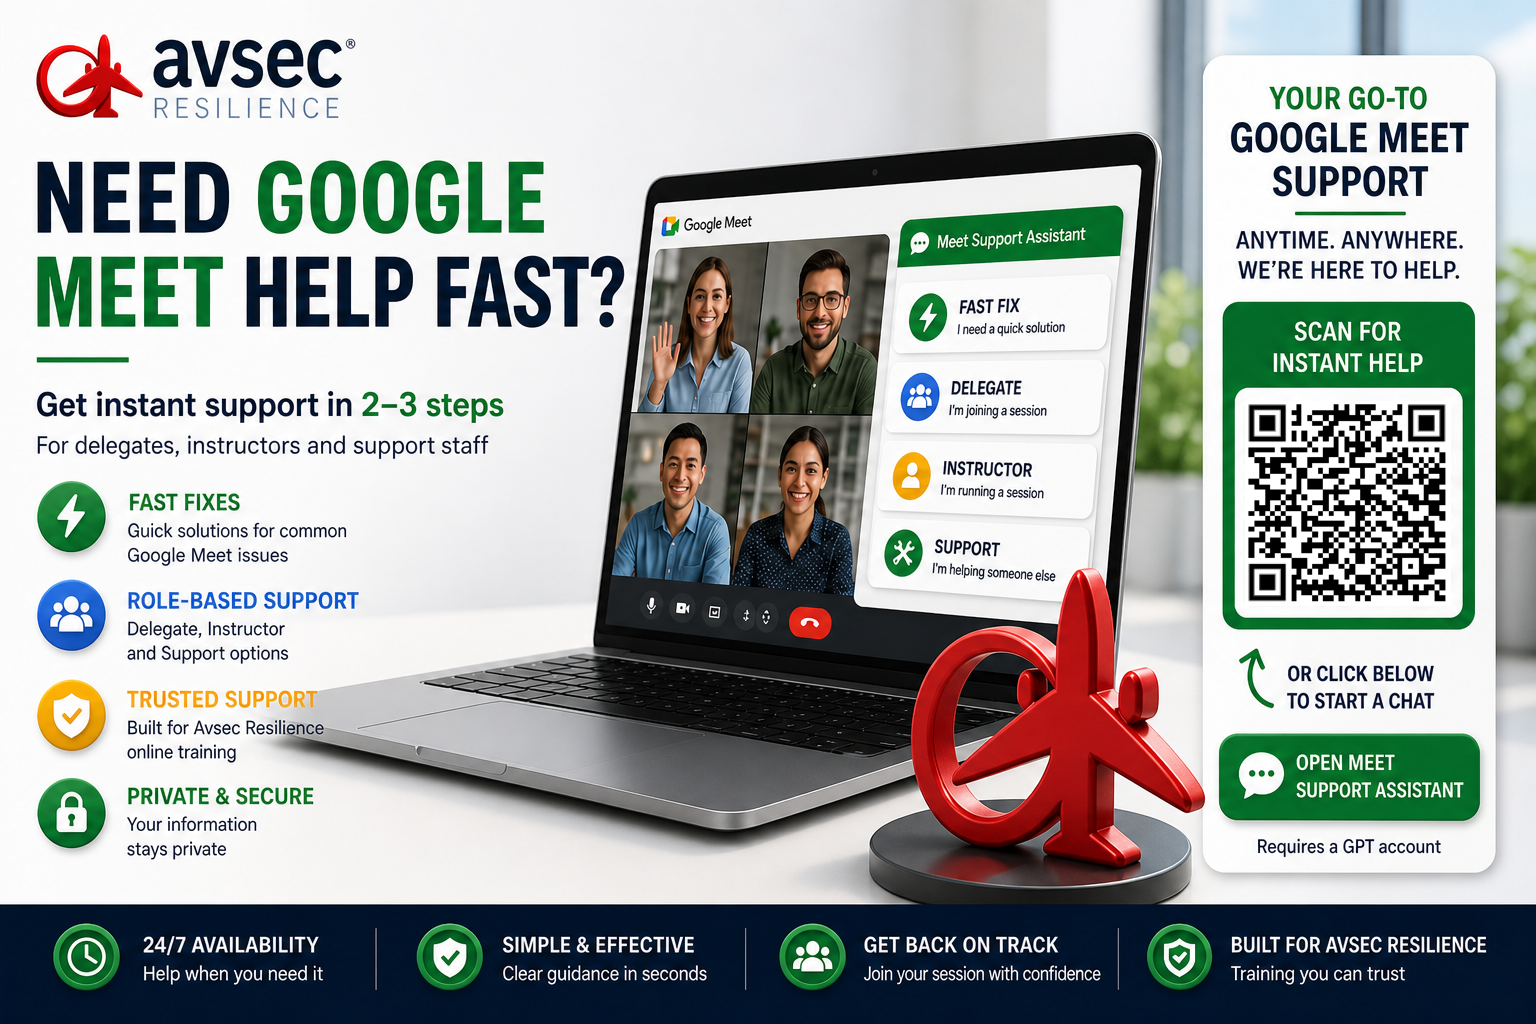

Our ChatGPT Google Meet Support Assistant helps you quickly fix common issues like audio, camera, or connection problems, so you can get into your session without delay.
Choose from:
• ⚡ Fast Fix (quick troubleshooting)
• 🎓 Delegate / Attendee support
• 🧑🏫 Instructor guidance
• 🛠 Support staff tools
Requires a ChatGPT account, free or paid
LIVE virtual classroom technical requirements & best practices
Our Google Meeting, based virtual classrooms provide real-time, instructor-led learning where you can interact, ask questions, and collaborate with others. Each course is designed to keep you engaged and supported through:
Live interactive sessions that encourage active participation
Q&A opportunities with your instructor throughout the day
Independent study time for projects, reading, research, or videos
Pre-course materials (reading or assignments) for some courses
How to test audio and video in Google Meet
Test your audio
Open Google Meet in your browser (meet.google.com).
Click “New meeting” → “Start an instant meeting.”
On the preview screen (before joining), check your microphone and speaker:
- Click the settings icon (⚙️)
- Go to the Audio tab
- Select your correct microphone and speakers
Speak into your microphone and confirm the input level moves.
Test your video
On the same preview screen:
- Ensure your camera is turned on
- Click the settings icon (⚙️) → Video tab
- Choose the correct camera from the dropdown
You’ll see a live preview window showing your video feed.
Handy shortcuts during class / meetings
Mute / Unmute microphone
- Ctrl + D (Windows)
- Command + D (Mac)
Turn camera on / off
- Ctrl + E (Windows)
- Command + E (Mac)
-
-
On the preview screen or during the meeting in Google Meet:
- Click the three-dot menu (⋮) → Settings → Audio
→ Select a different microphone or speaker - Click the three-dot menu (⋮) → Settings → Video
→ Switch between available cameras
.
- Click the three-dot menu (⋮) → Settings → Audio
-
Hardware requirements
- Minimum: 2 Mbps download / 1 Mbps upload
- Recommended: Wired (Ethernet) connection for best stability when using Google Meet
Test Your Internet Speed Before Class
- Go to: https://www.speedtest.net or https://fast.com
- Click Go / Start
- Confirm your speeds meet the minimum requirements
💡 Tip:
If your connection is slow, turn off your camera or close other apps using the internet to improve performance.
- A laptop or desktop computer is recommended for full use of Google Meet features (e.g. breakout rooms, screen sharing, collaboration tools)
- Tablets and smartphones are not recommended as a primary device
💡 Tip:
Mobile devices are useful for joining on the go, but may have limited features and reduced functionality compared to a computer.
- A headset with a built-in microphone is recommended for clear audio in Google Meet
- Avoid relying on built-in laptop microphones whenever possible
💡 Tip:
Using a headset helps reduce background noise, echo, and improves overall sound quality for both you and other participants.
- A second monitor is helpful for viewing training materials while keeping Google Meet open
- If using two devices:
- Only use one device for audio
- Mute or disconnect audio on the second device to avoid echo
💡 Tip:
You can split your screen in Google Chrome to view Google Meet and your training materials side by side on one screen.
Software requirements
-
Access Google Meet
Use Google Meet via your web browser:
You can also install the Google Meet mobile app (iOS / Android) for joining on phones or tablets.
Keep your browser updated
Google Meet runs in your browser, so keeping it updated ensures the best performance.
To update:
- Google Chrome: Settings → About Chrome → Check for updates
- Other browsers: Use their built-in update settings
Supported operating systems
- Windows
- macOS
- Linux
- ChromeOS
Supported browsers (recommended)
- Google Chrome (best performance)
- Microsoft Edge (Chromium-based)
- Safari (macOS – some limitations)
- Mozilla Firefox (limited feature support)
-
PDF reader for course materials
Use a PDF reader to access course documents and resources:
- Adobe Acrobat Reader (recommended)
- Or any built-in browser PDF viewer (e.g., Chrome, Edge, Safari)
Tools for assignments / projects
Depending on your course, you may need:
- Microsoft Office (Word, Excel, PowerPoint)
or - Google Workspace (Docs, Sheets, Slides)
Accessibility features in Google Meet
-
Administrators can enable accessibility features such as:
- Live captions (real-time subtitles)
- Meeting transcription (where available)
- Interpreter support for multilingual sessions
These can be configured by default for all users.
Additional information on accessibility is available, on the Avsec Resilience ® accessibility page
- Live Captions & Subtitles
Automatic, real-time captions available during meetings (via the “CC” button) - Transcription
Generates a written transcript during or after meetings (availability depends on organisation settings / plan) - CART Support
Integration with third-party captioning services where required - Sign Language Interpretation
Interpreters can be pinned or spotlighted to remain visible throughout the session - Meeting Chat & Reactions
Provide alternative, non-verbal ways to communicate and participate
-
- Screen Reader Compatibility
Works with screen readers such as Narrator, JAWS, NVDA, and VoiceOver (via browser support) - High Contrast & Dark Mode
Supports browser and device-level high contrast or dark mode for improved readability - Zoom & Magnifier Support
Compatible with browser zoom and operating system magnification tools - Adjustable Text Size
Chat and interface elements can be resized using browser zoom settings - Clean Interface & Focus Tools
Ability to pin presentations or speakers to reduce visual clutter and improve focus - Features like Immersive Reader are not native to Google Meet but similar accessibility can be achieved using browser or device tools.
- Screen Reader Compatibility
-
- Simplified Interface
Clean, uncluttered layout that helps reduce cognitive load and makes navigation easier - Focus on Active Content
Users can pin presentations or speakers to stay focused on key information - Live Captions
Reinforces understanding by displaying spoken content as text in real time - Clear Notifications & Controls
Simple meeting controls (mute, raise hand, chat) with minimal distractions - Chat & Visual Cues
Written chat and reactions support different learning styles and reinforce instructions
- Simplified Interface
- Keyboard Shortcut Support
Key actions such as mute/unmute, camera on/off, and raising hand can be done using keyboard shortcuts - Voice Control Support
Compatible with device-based voice control tools (e.g. Windows Speech Recognition, macOS Voice Control) - Accessible Navigation
Use Tab and arrow keys to move between interface elements and controls - Reduced Mouse Dependence
Simple layout and controls minimise the need for complex mouse interactions
- Pin / Spotlight Videos
Keep interpreters or key speakers visible at all times by pinning them on screen - Raise Hand & Reactions
Quick, non-verbal ways to participate and engage during sessions - Accessible File Sharing
Share materials via chat or Google Workspace (Docs, Sheets, Slides), which support accessible document practices - Custom Layouts
Adjust meeting view (e.g. tiled/grid or spotlighted view) to suit individual preferences
Google Meet translation options
During a meeting in Google Meet:
- Click the “CC” (captions) button on the meeting toolbar to turn on live captions
To change caption language (if available on your account):
- Click the three-dot menu (⋮) → Settings
- Go to Captions
- Select your preferred caption language
💡 Captions appear at the bottom of the screen in your selected language (availability depends on organisation settings and plan).
Live translation features may require a Google Workspace subscription and may not be available on all accounts.
If your organisation uses Google Workspace (supported plans), you can access translated captions in multiple languages.
🧭 How to Use
- Join a meeting in Google Meet
- Turn on captions by clicking the “CC” button
- Click the three-dot menu (⋮) → Settings → Captions
- Select:
- Spoken language (what the speaker is using)
- Caption language (your preferred translation language)
📊 Available Translations
Translated captions are available in a wide range of languages, including:
- English ↔ Spanish, French, German, Italian, Portuguese
- Japanese, Chinese
- Arabic, Hindi
- And many others (depending on availability and plan)
💡 Note:
Translated captions are typically available on Google Workspace paid plans and may not be enabled for all organisations by default.
In Google Meet, chat messages do not have a built-in one-click translate feature like Teams.
However, you can still translate messages using your browser tools.
🔧 How to Use (Workaround)
- Highlight or copy the chat message
- Right-click and select Translate (available in some browsers like Google Chrome)
or - Paste the message into a translation tool (e.g. Google Translate)
💡 Browser Translation Tip
- In Google Chrome, you can:
- Right-click → Translate to [your language]
- Or translate the entire page if prompted
⚠️ Note
- Translation is handled by the browser, not Google Meet itself
- There is currently no native “translate message” button in Meet chat
If transcription or recording is enabled in Google Meet:
🔧 How to Access
- After the meeting, open the meeting recording or recap (if available)
- Transcripts are typically:
- Attached to the recording
- Or saved to Google Drive
🌐 Translation Options
- Google Meet does not provide a built-in “Translate transcript” button
- To translate:
- Open the transcript file
- Copy the text into a translation tool (e.g. Google Translate or Docs)
💡 Tip:
You can paste transcripts into Google Docs and use built-in tools or add-ons to translate and format content.
⚠️ Note
- Transcription and recording features depend on your Google Workspace plan
- Availability and storage location may vary by organisation settings
-
The speaker can communicate effectively in most routine and some non-routine situations.
-
Pronunciation, structure, vocabulary, and fluency are generally understandable even if not perfect.
-
Occasional errors occur, but meaning is rarely obscured.
-
The speaker can manage misunderstandings and repair communication when needed.
Reference: ICAO Doc 9835 (2nd edition) — Manual on the Implementation of ICAO Language Proficiency Requirements.
Equivalent levels:
-
CEFR: B1–B2
-
IELTS: 4.5–5.5
-
TOEFL iBT: 42–71
-
TOEIC: 550–780
Open Incognito / Private Browsing
You use Incognito / Private Browsing to keep a session from being saved on the device.
People commonly use it to:
Log into another account without signing out
Prevent history and form data from being stored
Test websites without cached data or cookies
Use shared/public computers more safely
Avoid sites affecting future recommendations
Note: It improves local privacy only — it does not hide you from websites, networks, or internet providers.
Below is a how to guide for each browser
1.Open Opera.
2.Click the O menu (top-left).
3.Select New Private Window.
- Shortcut:
- Windows/Linux → Ctrl + Shift + N
- Mac → ⌘ + Shift + N
1.Open Chrome.
2.Click the three dots (⋮) in the top-right corner.
3.Select New Incognito Window.
- Shortcut:
- Windows/Linux → Ctrl + Shift + N
- Mac → ⌘ + Shift + N
1.Open Edge.
2.Click the three dots (⋮) in the top-right corner.
3.Select New InPrivate window.
- Shortcut:
- Windows/Linux → Ctrl + Shift + N
- Mac → ⌘ + Shift + N
1.Open Firefox.
2.Click the three horizontal lines (☰) in the top-right corner.
3.Select New Private Window.
- Shortcut:
- Windows/Linux → Ctrl + Shift + P
- Mac → ⌘ + Shift + P
1.Open Brave.
2.Click the three lines or dots (≡ or ⋮) in the top-right corner.
3.Select New private window.
- Shortcut:
- Windows/Linux → Ctrl + Shift + N
- Mac → ⌘ + Shift + N
Note: Brave also offers Private Window with Tor for extra privacy
Mac:
1.Open Safari.
2.Click File in the menu bar.
3.Select New Private Window.
- Shortcut: ⌘ + Shift + N
iPhone/iPad:
1.Open Safari.
2.Tap the tabs button (two overlapping squares).
3.Tap [X] Tabs or Start Page at the bottom.
4.Select Private → then tap + to open a private tab.
Environment recommendations
-
Quiet, well-lit space with minimal distractions
-
Reliable power source (avoid battery-only)
-
Notify others in your workplace/ household of your class times
-
Take breaks away from your screen during scheduled pauses
Learning experience expectations
Expect frequent interaction (polls, chat, breakout groups). You may be asked to contribute every 3–5 minutes.
Small group discussions and activities are part of the course.
Follow the same respect and participation norms as in-person training.
Classes are designed in shorter, focused segments with regular breaks.
Some sessions include follow-up work, reflection tasks, or group projects. (Dependent on client requirements)
A facilitator or co-host may be available to help with technical or chat management.
Frequently asked Questions (FaQ) – Using Google Meet for online training
You can join a session in Google Meet through a web browser or the mobile app.
- No account is required in some cases (depending on the meeting settings)
- A Google account is recommended for the best experience
👉 Access Google Meet here: https://meet.google.com
💡 Tip:
Using a browser like Google Chrome provides the most reliable performance and full feature access.
- Click the meeting link sent by your trainer
- The pre-join screen will open in Google Meet where you can choose your audio and video settings
- Select your microphone and camera, then click “Join now”
💡 Tip:
Join a few minutes early to check your audio and video before the session starts.
- On the pre-join screen in Google Meet, check your camera preview and microphone activity
- Click the settings icon (⚙️) to review your audio and video devices
- Ensure the correct speaker, microphone, and camera are selected
During a Meeting
- Click the three-dot menu (⋮) → Settings
- Go to Audio or Video to switch devices
💡 Note:
Google Meet does not use dropdown arrows on mic/camera icons like Teams — all device changes are managed through Settings (⋮).
-
Make sure the correct audio device is selected in Device settings.
-
Check your computer’s system volume.
-
Leave the meeting and rejoin if the problem continues.
n Google Meet, the most useful shortcuts are:
- Mute / Unmute microphone
Ctrl + D (Windows) / Command + D (Mac) - Start / Stop camera
Ctrl + E (Windows) / Command + E (Mac) - Raise / Lower hand
Ctrl + Alt + H (Windows) / Option + Y (Mac) - Open chat
Ctrl + Alt + C (Windows) / Command + Option + C (Mac)
💡 Tip:
Using keyboard shortcuts can make it much easier to participate quickly without needing to navigate menus.
Yes. You can join using the Google Meet mobile app.
- Download from the App Store (iOS) or Google Play (Android)
- Open the app and join using the meeting link or code
💡 Tip:
For the best experience on mobile, use a stable Wi-Fi connection and keep your device charged or plugged in.
No. You can join a session in Google Meet as a guest using the meeting link provided (depending on the meeting settings).
If your organisation has provided you with a Google account, it’s recommended to sign in for full features and a smoother experience.
💡 Tip:
Signing in can help avoid delays when joining and may give you access to additional features like chat, captions, and participation tools.
.
You can join Google Meet directly through a web browser.
Supported browsers include:
- Google Chrome (recommended for best performance)
- Microsoft Edge (Chromium-based)
- Safari (macOS – some limitations)
- Mozilla Firefox (limited feature support)
💡 Tip:
For the most reliable experience and full feature access, use Google Chrome.
In a meeting in Google Meet:
- Click the “Present now” button on the toolbar
- Choose what you want to share:
- Your entire screen
- A specific window
- A browser tab (best for videos or slides)
💡 Tip:
Use “Present a tab” when sharing videos or slides to get better audio and smoother performance.
Google Meet runs in your web browser, so there’s no separate app to update on desktop.
To ensure the best experience:
- Keep your browser up to date (especially Google Chrome)
- Restart your browser regularly to apply updates
On Mobile Devices
- Update the Google Meet app via the App Store (iOS) or Google Play (Android)
💡 Tip:
Using the latest browser or app version helps avoid technical issues during your training session.
Troubleshooting
- Check that your camera isn’t being used by another application (e.g. Zoom, Teams, or Skype)
- Click the three-dot menu (⋮) → Settings → Video and ensure the correct camera is selected
- Refresh your browser or rejoin the meeting
- Make sure your browser (e.g. Google Chrome) is up to date
💡 Tip:
If the issue continues, try restarting your device or testing your camera in another app to confirm it’s working properly.
In Google Meet:
- Use headphones or a headset to reduce background noise and echo
- Ensure only one device in the room is connected to audio
- Click the three-dot menu (⋮) → Settings → Audio
→ Check your microphone and speaker selection
💡 Tip:
If you hear echo, it’s usually caused by multiple devices or open speakers nearby — muting unused devices often fixes the issue.
- Move closer to your Wi-Fi router or use a wired (Ethernet) connection
- Close other applications using the internet (e.g. streaming, downloads, cloud sync)
- Turn off your camera to reduce bandwidth usage
💡 Tip:
If your connection is unstable, try refreshing the browser or rejoining the meeting for a more stable connection.
- Make sure the host has allowed participants to share their screen
- Click “Present now” and select the correct:
- Screen
- Window
- Browser tab
- Check your browser permissions (screen sharing must be allowed)
- If prompted, confirm sharing permissions on your device
💡 Tip:
Using Google Chrome often provides the most reliable screen sharing experience.
- Double-check the meeting link or code
Ensure you are using the correct link provided by your trainer - No app required (desktop)
You can join directly via a browser — no installation needed
(Mobile users can install the app if preferred) - Restart your device
Then try joining again - Check your internet connection
Make sure you are online and your connection is stable - Update your browser
Use the latest version of Google Chrome or another supported browser - Firewall or VPN issues
A work/school network, firewall, or VPN may block access
→ Try disconnecting from VPN or switching to a personal network - Browser issues
Clear cache and cookies or try a different browser - Wrong time zone
Double-check the session start time in your local time zone - Meeting access restrictions
Some meetings require host approval or sign-in before joining
💡 Tip:
If you still can’t join, contact your instructor or support team with a screenshot of the error message for faster help.
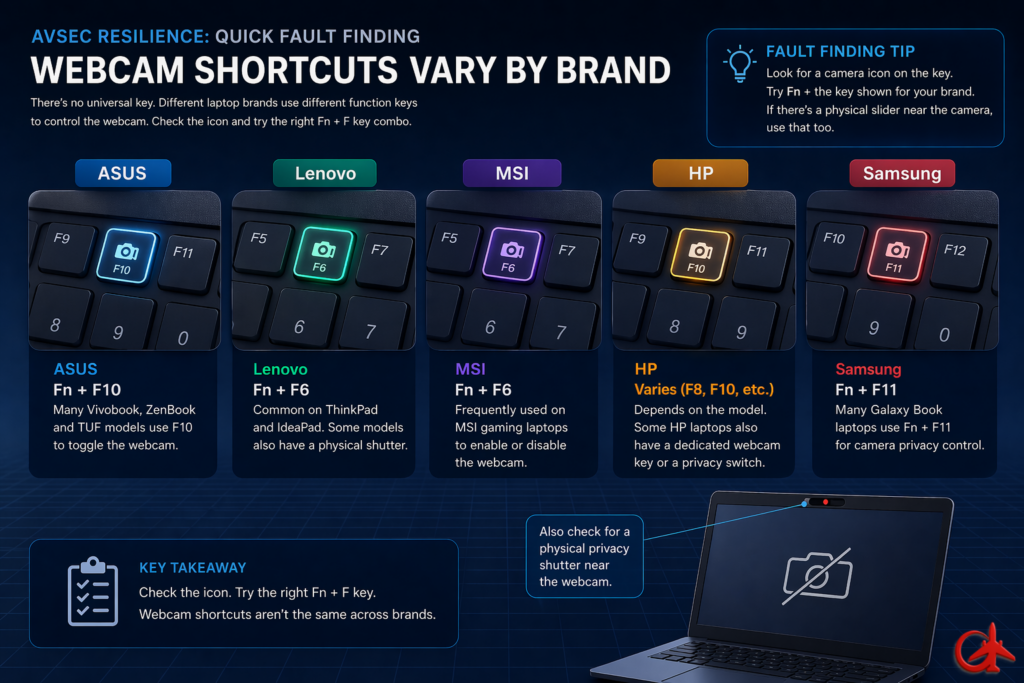
Quick internet tips
Shut down YouTube, Netflix, cloud backups (Google Drive, OneDrive, Dropbox), or downloads running in the background.
Ask family/housemates to pause streaming, gaming, or large downloads during your call.
-
If you’re on Wi-Fi → move closer to the router.
-
If possible → plug in an Ethernet cable for instant stability.
-
On mobile → switch to 4G/5G data if your Wi-Fi is weak.
-
urn video off if the call starts lagging.
-
Use “Turn off HD” in Teams video settings.
-
Stop virtual backgrounds, which need more processing + data
Quick Wi-Fi fixes
Even a few meters can reduce lag. Walls, doors, and floors weaken the signal.
If your router has both 2.4 GHz and 5 GHz networks:
-
Use 5 GHz if you’re close → faster and less crowded.
-
Use 2.4 GHz if farther away → stronger range.
-
Move away from microwaves, cordless phones, or Bluetooth speakers.
-
Turn off Wi-Fi on other unused devices (old tablets, spare phones).
-
Higher is better → raise your laptop/phone or router off the floor.
-
Open the door if you’re in a closed room.
Disable HD video and virtual backgrounds → lowers Wi-Fi load.
Background and renaming
Before joining a meeting in Google Meet:
- On the pre-join screen (where you check your mic and camera):
- Turn your camera on
- Click the “Apply visual effects” icon (✨ or background icon)
- You’ll see these options:
- Blur – softly blurs everything behind you
- Slight blur – lighter background blur
- Backgrounds – choose from default images
- Add your own – upload a custom image (e.g. office, beach, etc.)
- Select your desired effect → click “Join now”
💡 Tip:
Use a simple, non-distracting background to keep the focus on you during training sessions.
- Move your mouse to show the toolbar → click the three-dot menu (⋮)
- Select “Apply visual effects”
- Choose one of:
- Blur (full background blur)
- Slight blur
- Preset backgrounds
- Add your own (upload a custom image)
- Click to apply your selected background
💡 Tip:
Unlike Teams, Google Meet does not support avatars — only background effects and filters are available.
Before Joining a Meeting
In the Google Meet app:
- On the pre-join screen, tap the ✨ (effects) icon on your video preview
- Choose:
- Blur
- Slight blur
- Preset backgrounds
- Add your own (if supported)
- Tap Done → then tap “Join”
During a Meeting
- Tap your screen → tap the three-dot menu (⋯)
- Select “Apply visual effects”
- Choose Blur or another background
💡 Note:
Background effects require iOS 14 or later and a compatible iPhone or iPad model.
Your profile picture in Google Meet is linked to your Google account, so you’ll update it there.
💻 On Desktop (Windows or Mac)
- Open your picture on your computer:
- Windows Photos → click rotate (↻) twice (180°)
- Mac Preview → Tools → Rotate Left twice
- Save the rotated image
- Go to your Google account: https://myaccount.google.com
- Click your profile picture → Change / Upload photo
- Upload the rotated image
📱 On Mobile (Android / iPhone)
- Open the image in your Photos / Gallery app
- Tap Edit → Rotate (rotate 180°)
- Save the image
- Open your Google account (via browser or Gmail app)
- Tap your profile picture → Change photo
- Upload the rotated version
💡 Tip:
Your updated photo will appear automatically in Google Meet, Gmail, and other Google Workspace apps.
In Google Meet, your display name is linked to your Google account.
Before or Outside a Meeting
- Go to your Google account: https://myaccount.google.com
- Click Personal info
- Under Name, click Edit (✏️)
- Enter your new display name → click Save
⚠️ Important
- If you are using a work or school account (Google Workspace), your organisation’s admin may restrict name changes
- In this case, you may need to contact your IT/admin team
During a Meeting
- Google Meet does not allow you to rename yourself during a meeting if you are signed in
However:
- If you join as a guest, you can enter your name before joining on the “Enter your name” screen
💡 Tip:
Your updated name will appear across all Google Workspace apps (Meet, Gmail, Docs, etc.).
In Google Meet, your display name is managed through your Google account.
Before a Meeting
- Open the Gmail app or go to your Google account in a browser
- Tap your profile picture (top-right)
- Tap Manage your Google Account
- Go to Personal info
- Tap Name → Edit (✏️)
- Enter your new name → tap Save
⚠️ Important
- If your account is managed by an organisation (Google Workspace), this option may be restricted or unavailable
- In this case, contact your IT/admin team
💡 Tip:
Your updated name will appear automatically across all Google Workspace apps, including Google Meet.
How to align your Google Meet profile with LinkedIn
- Google Meet uses your Google Account profile
- No direct LinkedIn integration exists
- Your identity is based on your Google account details
- Update your Google Account name to match LinkedIn
- Use the same profile photo
- Ensure your company/job title aligns
- Use the same email for:
- Google account (Meet)
- LinkedIn profile
- Or add your Google email as a secondary email on LinkedIn
- Google Meet is tied to Google Calendar
- Ensure your calendar profile matches LinkedIn
- Add meeting descriptions or titles that reflect your role
- Double-check your display name before joining
- Use a professional image
- Avoid nicknames or personal aliases
- Personal Google account vs work LinkedIn mismatch
- Different names across platforms
- Assuming LinkedIn data syncs automatically (it doesn’t)
🖱️ Mouse pointer size guide
- Makes the cursor easier to see during screen sharing
- Helps accessibility for users with visual strain
- Improves audience visibility in presentations
-
🔍 Increase pointer size
- Click Start Menu
- Open Settings
- Select Accessibility
- Click Mouse pointer and touch
- Use the Size slider to make the pointer larger
🔄 Reset to default
- Move the Size slider back to the smallest setting
🎤 Trainer tip
Say: “If your audience can’t see your cursor clearly, increase it before presenting.”
🔍 Increase pointer size
- Click the Apple menu ()
- Open System Settings
- Go to Accessibility
- Select Display
- Adjust the Cursor size slider
🔄 Reset to default
- Move the slider back to the smallest position
⚡ Bonus feature
- Shake your mouse quickly to temporarily enlarge the cursor
🔍 Increase pointer size
- Open Settings
- Go to Accessibility
- Find Cursor Size
- Select a larger option
🔄 Reset to default
- Choose the default or smallest size
Before starting your session:
- Increase pointer size slightly (not too large)
- Move cursor slowly when presenting
- Avoid rapid movements (hard for viewers to follow)
Taking a great Google Meet course picture
✅ Sit facing a window for natural light (avoid having a window behind you).
✅ If indoors, place a soft light (lamp or ring light) slightly above eye level in front of you.
❌ Avoid harsh overhead lights (they cause shadows).
✅ Position your camera at eye level (stack books or use a stand if needed).
✅ Frame yourself from the chest up (“head-and-shoulders” view).
✅ Keep a little space above your head (not cut off).
✅ Wear solid colours (avoid stripes or tiny patterns, which cause distortion).
✅ Choose colours that contrast your background (so you don’t blend in).
✅ Keep it professional but comfortable — like a virtual classroom outfit.
✅ Sit upright with relaxed shoulders.
✅ Smile naturally (warm, approachable look).
✅ Look into the camera lens, not the screen — it feels like eye contact.
Tips for Google Meet course pictures
Save this page to favorites/ or bookmark
Works the same in Chrome, Edge, Firefox, Brave, Opera
✅ Save to Favourites
-
Open the website
-
Click the ⭐ star icon in the address bar
(top right of the browser) -
Choose a folder (optional)
-
Click Done / Save
⌨️ Keyboard shortcut
Ctrl + D
📂 View Favourites
-
Click ⭐ or three dots (⋯) → Bookmarks / Favourites
Works in Chrome, Safari, Edge, Firefox
✅ Save to Favorites
-
Open the website
-
Click the ⭐ in the address bar
OR menu bar → Bookmarks → Add Bookmark -
Choose location → Add
⌨️ Shortcut
Command (⌘) + D
📂 View Favourites
-
Click Sidebar icon or Bookmarks menu
Works in Safari, Chrome, Edge, Firefox
✅ Save to Favourites
-
Open the webpage
-
Tap the Share icon (⬆️ square) or three dots
-
Tap ⭐ Add Bookmark or Add to Favourites
-
Tap Save
📂 View Favourites
-
Open a new tab → tap Bookmarks / Favourites
Works in Chrome, Samsung Internet, Edge, Firefox
✅ Save to Favourites
-
Open the website
-
Tap three dots (⋮)
-
Tap ⭐ Bookmark
-
Edit name/folder → Save
📂 View Favourites
-
Three dots (⋮) → Bookmarks / Favourites
Backup & support
-
If you lose internet connection: re-join using the same Google Meet link.
-
If technical issues persist, contact Avsec Resilience Point of Contact (POC) or IT support (details in your pre-course email).
-
Sessions may be recorded (course-dependent) — check with your instructor.
Clear Cookies
You clear cookies to fix problems, protect privacy, and reset how websites interact with you.
Common reasons to clear cookies:
🔐 Protect privacy – removes stored logins and tracking data
⚙️ Fix website issues – solves problems like pages not loading, errors, or broken logins
🔄 Reset websites – clears saved preferences and sessions
👥 Sign out of accounts – especially useful on shared devices
🛒 Remove outdated data – fixes issues with carts, forms, or personalization
In short: clearing cookies removes stored site data so websites start fresh.
Below is a how to guide for each browser

On desktop:
- Click the three dots ⋮ → Settings → Privacy and security → Site settings.
- Select View permissions and data stored across sites (or search for the site in the top-right).
- Find the website → Click the trash bin icon 🗑️ or Clear displayed data.
- Click ⋯ → Settings → Cookies and site permissions → Manage and delete cookies and site data.
- Click See all cookies and site data.
- Search for the site → click the arrow ▸, then trash bin 🗑️.
- Open Settings → Privacy & Security.
- Under Cookies and Site Data, click Manage Data….
- Type the site name in the search bar.
- Select it → Remove Selected → Save Changes.
On Mac:
- Go to Safari → Settings → Privacy → Manage Website Data…
- Search for the website.
- Select it → Remove.
On iPhone/iPad:
- Go to Settings → Safari → Advanced → Website Data.
- Search for the website.
- Swipe left on it → Delete.

Continue browsing courses